How to Replace a Bathroom Faucet easy way by resisories
Posted by
Julian Gill
|
Updated on
September 26, 2023
Disclosure: Some of the links in this article may be affiliate links, which can provide compensation to me at no cost to you. You can read our affiliate disclosure in our privacy policy.

How to Replace Or Install Bathroom Faucet (Easy DIY Guides)

The bathroom faucet is a really important part of any home. If it’s not working properly or gets older then it’s may need to change the old bathroom faucet. That’s why we are going to talk about the installation of a new bathroom faucet or replace the old one in a proper way.

It’s a great way to replace your old bathroom faucet by yourself to save on installation costs, and it can be a great DIY project. Below, you’ll learn about the tools and materials that you need, the steps to follow, and some pointers to help you be successful even if it’s the very first time.

Replacing a bathroom faucet Step By Step

Excited about taking on this cool DIY project yourself?  You aren’t alone; it’s a popular one for those in home improvement! However, part of preparation is going to be making sure that you carve out your budget and timing for it to be successful.

How to replace a bathroom faucet Step By Step
You can expect to pay anywhere around $60, depending on what you need to buy, and your faucet replacement itself. Timing should be about 1–2 hours, but you may find it longer if this is your first time, especially if you are learning to use the tools.
What You’ll Need to Do this Project
Basin wrench
Penetrating oil or lubricant
Putty knife
Large zip lock bags
Adjustable pliers
Slip-joint pliers
Hand gloves
Mineral spirits
Identify your Old Bathroom Faucet and Remove it

Before you start buying a new bathroom faucet, you need to know what type of setup you already have. If it’s the existing bathroom faucet is two-handled, then measure the distance between the handles. If it’s 6-inch or more, then you will need a widespread bathroom faucet. On the contrary, you’ll need a center-set bathroom faucet.
Remove Your Old Faucet

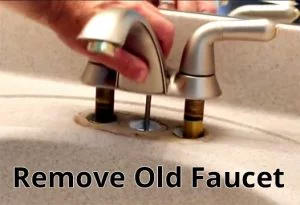
But my suggestion is, remove your old bathroom faucet first then measure the distance and count the holes.

To remove your old bathroom faucet, shut-off the water supply lines underneath the sink by turning the valve clockwise.
Next, take a basin wrench and unscrew the nuts of water supply lines. (If it’s a single hole faucet then there is a single line with one nut.)

Pro Tips: Clockwise makes the nuts tighter and counter clockwise makes them looser.

Then unscrew the big nuts between the faucet and the bottom of the sink using the basin wrench. If the nut is stuck then apply penetrating oil or lubricant.
When the nuts are off, clean the old putty or caulk using a putty knife and lift out the bathroom faucet gently. Place the faucet into one of the large zip lock bags.

Now measure the distance and count the faucet holes.

If there is only one hole, then you’ll need a single-handle bathroom faucet. If the number of holes is two then you’ll need a double-handle bathroom faucet. But if you want to convert the two-handle bathroom faucet to one handle then buy a single-handle faucet with a baseplate to hide the unused hole on the countertop. You should concern about the baseplate size if it is large enough to cover the unused holes.

Remove the Old Drain

Some bathroom faucets come with matched drains. If so, then you need to remove the old drain and install the new one.
First, remove the p trap underneath the sink. Look out the nuts and unscrew them using adjustable pliers.
The nuts may be hard to turn. Put on rubber gloves and use slip-joint pliers to disamble the P-trap.
Next, remove the old drain gently. Clean the holes using mineral spirits.
Install the New Bathroom Faucet
Place your new bathroom faucet on the mounting holes. Set the gasket on the holes.
After placing the faucet, tight the mounting nuts underneath the sink
Then re-connect all the supply lines.
Tight them using a adjustable wrench.
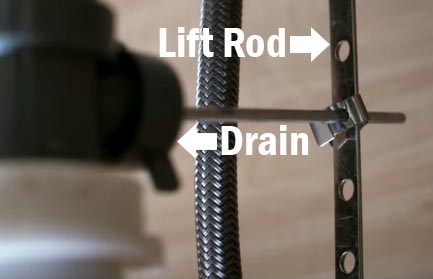
If the new faucet comes with a lift rod then attach the lift rod of the faucet to the drain (check the picture below)
Connect the Lift rod to the drain
Connect the Lift Rod to the drain
Now, turn on the water valve and check if it’s leaking or not.
If there is any leak then turn off the water and tighten up the conncections.

Conclusion

In conclusion, replacing or installing a bathroom faucet is a relatively easy task that can be accomplished in a short amount of time with the tools and instructions given above. By following the simple steps outlined in this article, you can successfully replace or install a bathroom faucet without any trouble.

See also

Julian Gill
Julian Gill is a mechanical engineer and working in the plumbing sector for the last seven years. To be a professional, Gill had completed the CPD (Certified in Plumbing Design) program successfully. Besides this, he also works in home improvement and remodeling.
Julian Gill
Hi! I’m Julian Gill.
My mission is to help people in purchasing decisions about home, kitchen and garden accessories.
Oh! And I’m also a plumber. I usually repair what husbands fixed.
Resi
Disclosure: Some of the links in this article may be affiliate links, which can provide compensation to me at no cost to you. You can read our affiliate disclosure in our privacy policy.

[wp_reusable_render id='7030']

Buying Guides

  • Best Undermount Kitchen Sinks for Quartz Countertops

    5 Best Undermount Kitchen Sinks for Quartz Countertops (& Buying Guide)

  • best kitchen faucet with side sprayer

    The 5 Best Kitchen Faucet With Side Sprayer in 2023

  • Featured img best high end kitchen faucet FB Resisories

    The Best High End Kitchen Faucet You Must Have in 2023

  • best kitchen sink for hard water Featured FB img

    The 10 Best Kitchen Sinks for Hard Water (Updated Guides)

  • Moen 1224 vs 1224b vs 1248

    Moen 1224 vs 1224b vs 1248 – Grab the Perfect One!

  • Delta H2Okinetic Reviews

    Delta H2Okinetic Reviews in 2023